Easy Step-by-Step Pencil Drawing Tutorial for Beginners

Learn how to draw a bear with this easy, step-by-step pencil drawing tutorial for beginners. Discover tools, anatomy, shading, and expert tips to sketch a realistic bear—even if you’re brand new to drawing.
Introduction: Why Drawing Bears Is So Fun (and Easier Than You Think!)
Have you ever seen a bear in a photo or nature documentary and thought, “That would be amazing to draw”? Bears are powerful, majestic, and surprisingly expressive—making them one of the most rewarding animals to sketch.
The best part? Drawing a bear isn’t as hard as it looks. By breaking it down into simple shapes and step-by-step details, you’ll be able to create a lifelike bear sketch, even if you’re a complete beginner.
This tutorial will guide you through the basics: from tools and anatomy to shading, textures, and background ideas. By the end, you’ll have your very own bear artwork to be proud of.
Grab your pencil—let’s begin!
Essential Drawing Tools You’ll Need to Sketch a Bear
No fancy art supplies required! Just gather these basics:
- Pencils and Pens: Nothing fancy, since your just getting started.
- Eraser: A kneaded eraser is perfect for lightening areas and correcting mistakes.
- Blending Stump: For smooth shading and fur textures.
- Paper: For getting started, you can use any type of paper, such as printing paper.
- Sharpener: Always keep your pencils sharp for detail work.
- Reference Image: A clear photo of a bear will help with proportions and shading.
Understanding Bear Anatomy: The Secret to Realistic Animal Drawings
Before you start sketching, it helps to know the bear’s basic structure. This is no small undertaking, because sketching animal anatomy is very challenging. Using a photo reference will be helpfull, but drawing from real life is key to successfull animals anatmoy mastery. The online market place has many artist drawing animals, but 80% of these drawings don’t have a solid understanding of the animals habitat, fur or bone structure. Most artist seem to focus on details first, but rendering a decent animal drawing requires you to start with a broader design, such as composition, proportions and most importantly, legs! Everybody gets the legs wrong!

- Head
Bears have wide, rounded heads with short snouts and small rounded ears. - Eyes & Nose
Their eyes are small compared to their head, while their nose is broad and oval-shaped. - Body
Stocky and powerful, with thick shoulders and a large belly. - Legs & Paws
Bears have strong, column-like legs with big paws and visible claws. - Fur
Thick and shaggy—don’t draw every strand, but suggest texture with shading.
Understanding these features makes your bear sketch look strong and realistic.

How to Draw a Bear Step by Step (Beginner’s Guide)
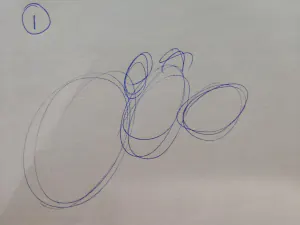
Step 1: Sketch the Basic Shapes
- Start with a large oval for the body.
- Draw a smaller circle for the head.
- Connect them with a short neck line.
- Add small ovals for the ears and a rectangle-like shape for the snout.
- Sketch four thick legs using simple cylinders.
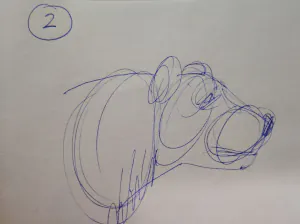
Step 2: Outline the Head and Face
- Add rounded ears on top of the head.
- Draw the snout with a broad nose at the tip.
- Place small eyes above the snout.
- Lightly sketch a mouth line under the nose.
Step 3: Shape the Body and Legs
- Refine the oval body into a round, muscular torso.
- Add thick, bear-like legs, slightly bent at the joints.
- Sketch wide paws with claws.
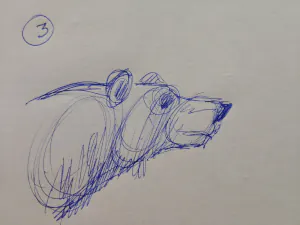
Step 4: Add Fur Texture and Tail
- Bears have very short tails—just a small bump.
- Use short, overlapping strokes around the body to suggest fur.
- Keep it rough and layered, not smooth.
Step 5: Refine and Shade
- Erase your guidelines carefully.
- Darken outlines with a 2B or 4B pencil.
- Shade the fur, legs, and face to add depth.
- Leave light areas on the snout and ears for highlights.
Pro Tips: How to Draw a Bear Standing or Walking
Want to try a more dynamic pose?
- Walking Bear: Tilt the oval body forward and bend one leg. Add motion by lowering the head slightly.
- Standing Bear: Draw the bear upright with the front paws raised. Keep the body wide and balanced.
Remember—bears are heavy, so give your lines weight and strength.
Shading and Fur Texture: Making Your Bear Look Real
Shading is the key to a realistic bear.
- Use layered pencil strokes to suggest thick fur.
- Darken shadow areas (under the belly, legs, and neck).
- Leave lighter areas around the nose and forehead for contrast.
- Blend with a stump for smooth areas, but keep some rough texture for fur.
Tip: Vary your pencil pressure—light for highlights, dark for shadowed fur.
Using Reference Images to Improve Your Bear Drawing
A good reference image helps a lot.
- Choose a clear side-profile photo of a bear to start.
- Study how the fur reflects light and how shadows fall.
- Focus on shapes and proportions, not every detail.
- Compare your sketch with the photo to spot differences.
Common Beginner Mistakes (and How to Fix Them)
| Mistake | Fix |
|---|---|
| Making the bear too slim | Keep the body wide and rounded |
| Oversized ears | Remember: bear ears are small and rounded |
| Smooth fur lines | Use short, rough strokes for texture |
| Paws too small | Make them big and flat for realism |
| Forgetting weight | Bears look heavy—give them a grounded stance |
Adding Backgrounds: Bring Your Bear Drawing to Life
A bear looks even more impressive with a natural setting.
- Forest Scene: Add trees, rocks, or bushes behind your bear.
- Mountain Scene: Sketch rugged terrain to suggest wilderness.
- River Scene: Draw a bear fishing, with water ripples around its paws.
Keep backgrounds lighter so the bear stays the focus.
Advanced Bear Drawing Techniques (For When You’re Ready to Level Up)
Once you’re comfortable with basic pencil sketches, try:
- Ink & Pen – Cross-hatching for fur texture.
- Colored Pencils – Browns, blacks, and tans for realistic shading.
- Graphite Layering – Use multiple pencil grades (HB, 2B, 4B, 6B) for depth.
Frequently Asked Questions About Drawing Bears
Q1: How long does it take to learn to draw a bear?
Most beginners can sketch a decent bear in 2–3 weeks with daily practice.
Q2: What’s the easiest bear pose for beginners?
Start with a side profile of a walking bear—it’s simple and balanced.
Q3: Do I need to draw every strand of fur?
No! Suggest fur with shading and texture instead of drawing every hair.
Q4: Can kids draw bears too?
Yes—begin with basic shapes and build up details slowly.
Q5: What’s the hardest part of drawing a bear?
The fur and proportions. Practice shading in layers to make it realistic.
Q6: How do I make my bear sketch look realistic?
Focus on weight, texture, and shading—and always use reference images.
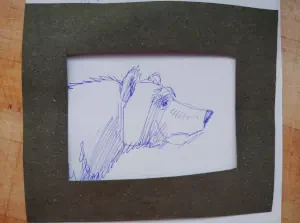
Final Thoughts: Keep Practicing and Your Bear Art Will Grow Stronger
Congratulations—you’ve just completed this step-by-step bear drawing tutorial!
At first, a bear might seem tricky because of its bulk and fur. But by starting with simple shapes, layering shading, and studying real bear anatomy, you can create a sketch that looks powerful and lifelike.
The more you practice, the more confident you’ll get. So grab your pencil, keep sketching, and let your bear drawings grow stronger with each attempt.
Your bear art journey has only just begun!